A free but often overlooked research for genealogy is Google Maps (GM). GM tends to be able to locate even very small villages in obscure parts of Eastern Europe--including villages that JewishGen doesn't have in its ShtetlSeeker database. As an example, I discovered that the Tolchinskys had lived in Nezhin before emigrating; however, Hillel Tolchinsky's boat record had him last living in "Losinowka," which had realistic hits on JewishGen. Panning around the Nezhin area, I discovered that Losinovka is a small village just south of Nezhin.
I've found it especially useful for plotting out my family's towns and putting notes into each about who lived there and sometimes how I know that fact. My ancestors came to America from Russia, Hungary, Slovakia, and Poland. But looking at the map now reveals those towns are all in modern-day Ukraine!
GM allows you to view your family towns from above, using the satellite view. You can scope out the size of the town today, how isolated it is, and how closely packed the homes are. If you're lucky, Google StreetView has been to the town, and you can virtually drive around to see what the town looks like today.
I've found it especially useful for plotting out my family's towns and putting notes into each about who lived there and sometimes how I know that fact. My ancestors came to America from Russia, Hungary, Slovakia, and Poland. But looking at the map now reveals those towns are all in modern-day Ukraine!
When I'm wondering if a town is near one of my ancestral towns, I can just look at that town on my personal map and see if it is near any of my pins. I can also track my ancestors' migration routes--relatively far distances in the pre-automobile era!
So how do you create your own map? First go to Google Maps.
Click on "My Places."
You'll then get this screen:
Click on "Create Map."
Pick a name for your map and choose your privacy settings. Then click on Done. Your map has been created!
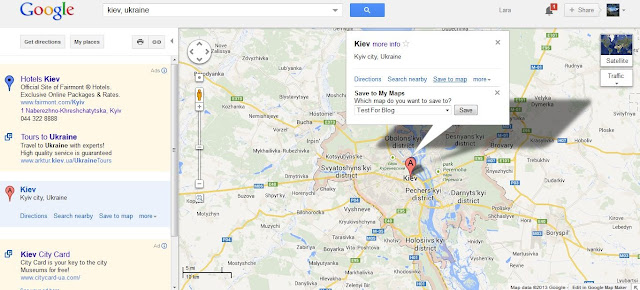
Now you need to add places. Just search for a location in the search bar near the top of the page. Once it finds your location, click on the location pin in the map, click "Save to map," then make sure the correct map is selected. Press "Save" and it will be added to your map! Do this for each location you want to save.
You can now customize your locations. Go back to "My Places" and then click on your blog name. You'll see all of the locations that you have added. Click on any location to edit, and you can change what the marker looks like, what is displayed, and you can also add notes and pictures.
Any other tips for Google Maps? Please leave them in the comments.
So how do you create your own map? First go to Google Maps.
Click on "My Places."
You'll then get this screen:
Click on "Create Map."
Pick a name for your map and choose your privacy settings. Then click on Done. Your map has been created!
Now you need to add places. Just search for a location in the search bar near the top of the page. Once it finds your location, click on the location pin in the map, click "Save to map," then make sure the correct map is selected. Press "Save" and it will be added to your map! Do this for each location you want to save.
 |
| Adding a site to my map |
Any other tips for Google Maps? Please leave them in the comments.


No comments:
Post a Comment